We’re doing a social thing at work – sharing photos/videos/whatevers of our homes, and others will guess to whom each home belongs. I’m definitely doing photos; there’s no question about that!

I’m quite sure that nobody at work reads my blog. Otherwise, whoever does will get major spoilers here. Well, if they read my blog then they will have seen plenty of photos of the house already so this won’t make any difference…

Anyway, here are some photos I took of various parts of the house. All rooms are represented except the bedroom and the children’s rooms. I also skipped my home office because my colleagues see it every day in our online meetings, so a photo of that would make the challenge way too easy.

I am willing to bet money that all the other homes will have predominantly white walls.


The schools in Sweden are all open, but Ingrid’s and Adrian’s Estonian lessons are taking place online – I’m guessing because the teacher would otherwise be travelling back and forth between schools across town, and that’s not good from the point of view of infection control.

Ingrid has “proper” lessons and tests and things. Adrian’s lessons are more like extended homework, but online.

Quite often one of the tasks is writing. Write x sentences about an animal, write x sentences using words from the previous exercise.

Normally he would write them in his exercise book. Now that the lessons are happening online, he writes them in Word on my computer.

He insisted that the document needed at least one emoji. Preferably lots, and weird ones – somehow homework in Word doesn’t feel like real homework and he doesn’t take it as seriously as his normal schoolwork. We agreed on one “teacher” emoji in the end.


Yesterday was a day of gardening – of soil chemistry and strawberry plants. We also made a trip to a nearby garden centre to make a start on planting that curve between sections 4 and 4b.

I had a list of ideas, but when I got there, I still felt lost and aimless. They didn’t have some of the bushes I wanted, even though they are quite common ones. Of other species they had the “wrong” varieties. Or their estimates of final size didn’t match up with what I’d read online. And with all those changes, I just couldn’t picture the whole thing in my head.

Still, I bought a few bushes to at least make a start. Later in the evening Ingrid and I went out and made a more serious attempt at a design. IKEA’s Trofast boxes made great stand-ins for plants: durable, stable, visible, and mud-proof.

Ingrid was great help in this! “What if we swap these two, so we get a more interesting height variation here? Should we have something dense and ball-shaped here next to the flowering one?”

Armed with this new, much clearer design idea, we made a new, more confident shopping trip today and came home with plenty more bushes. Our shrubbery curve is starting to become reality!

From yesterday: one Cornus mas, one Amelanchier alnifolia, one Cornus sanguinea ‘Midwinter Fire’, and two blackcurrants ‘Delikatesnaja’.

Today the pink Trofast box turned into a Hydrangea or two, the three white ones into Spiraea japonica and the three green ones into Thuja occidentals ‘Danica’.

I’m not convinced of our ability to keep Hydrangea bushes alive. The internet says they die if you’re not really diligent about watering them. But Ingrid has been fascinated by them for years, and it is the one and only bush she really wants to have in the garden, so we’ll give it a try.


I’m still thinking about the large mossy patches in the back garden. Could it be because the soil is more acidic there? The soil there is definitely different than in front of the house, much sandier and less full of heavy clay.

We should have some pH indicator strips somewhere, and even an electronic gadget to measure acidity, for the pool. But we seem to have put those away in such a good place that we can’t find them any more, even after searching through the kitchen, the laundry room/pantry/mud room, and the basement shelves.

We could buy new ones (and will have to, anyway, for the pool) but I wanted some answers today, now! Instead of shopping, we did home chemistry. Dug up soil samples, mixed them with water, and then tested half of each sample with white vinegar and the other half with baking soda.

The results were very boring. No fizzing anywhere. So I guess the soil is neutral. It is of course also possible that our chemistry experiment was too crude – perhaps we should have taken more of something, or mixed it better… but whatever, it’s not really that important.

But chemistry that doesn’t go fizz and bang and change colours is very dissatisfying. When we were done with the testing, Adrian got to pour the vinegar-mixed sample onto the bicarbonate sample to at least get some proper fizzing out of it. Much better!

In the afternoon we planted more strawberry seedlings. That is, Ingrid planted strawberry seedlings, while Adrian planted my hand tools (in neat, straight rows and at equal distances and at the same depth!) and I took photos.

We now have one box with older plants of either Honeoye or Zephyr (the sign says Zephyr but I thought we had Honeoye there) and three plants with this year’s seedlings: Polka, Florence and Senga Sengana.


I like jigsaw puzzles. Adrian likes almost any activity that he can do together with someone. So sometimes we do jigsaw puzzles together.

We do it together, but we have very different approaches. I focus on eye-catching, easily defined areas – distinctly coloured features, well-defined edges of things. I pick out pieces that appear to be part of that area, look at them to figure out what goes where, and gradually put them all together. Then I pick the next suitable area or feature and do the same thing.

Adrian’s approach is all trial and error. He doesn’t really look at the details of the pieces, neither colour nor shape. He just goes through all possible matches, methodically, one by one, until one piece clicks. Then he repeats that with the spot next to the piece he just put there. Like me, he works with one well-defined area at a time, because his approach only works if he has all the possible candidate pieces in a little pile. But he barely looks at the pieces, so what’s on them almost doesn’t matter. In fact he prefers the featureless single-colour areas – the empty skies and such – because it’s easiest to sort out all those pieces in one go.


We will hopefully be getting tomatoes this summer.


All these lovely bushes, and the cherry trees!

They would have more of an impact if they weren’t half-buried in grass, wouldn’t they… But there are so, so many more interesting things to do in the garden than mowing the lawn! Especially since mowing is a solitary activity, whereas almost every other task – digging, planting, weeding, watering – I can do together with Adrian, who loves being out in the garden with me.

I should get the mowing done on a weekday so we can do more fun stuff outside in the weekend.


Poppy seed buns, like the ones my mother used to make when I was a child. I love them.


After a few years of focused effort, the front of the garden is starting to look pretty good, even though there is plenty more lawn there, waiting to be replaced with better things.

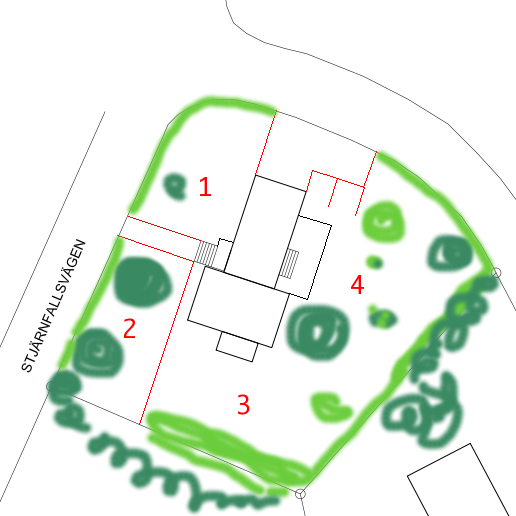
Ingrid has been complaining a bit about how bare and boring some parts of the back garden are, especially those that we see every day from the living room and the wooden deck. I agree. So this season I’ll be switching focus to spend more time on that area. (Part 4 in this sketch that I made in 2012.)

I’ve simply been procrastinating until now because I don’t know how to approach it. It feels complicated.

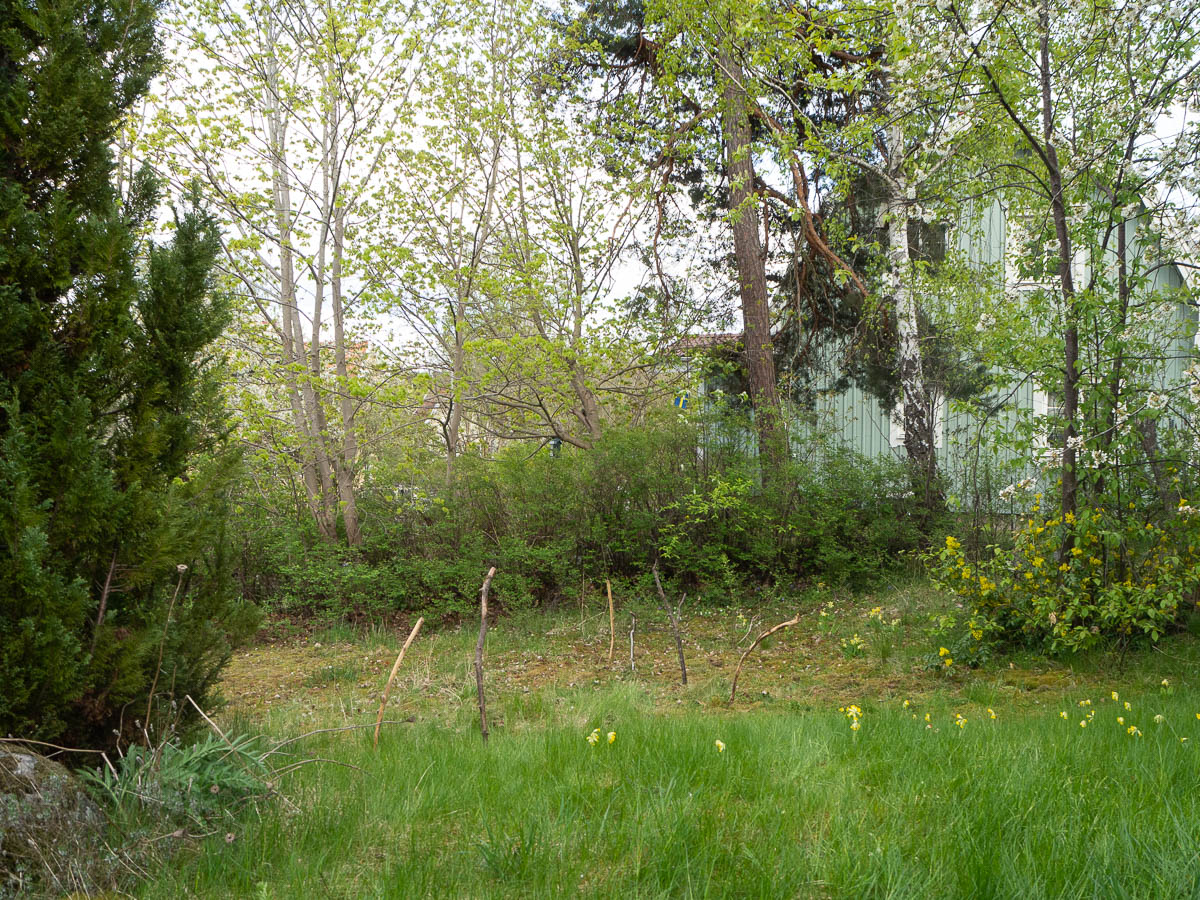
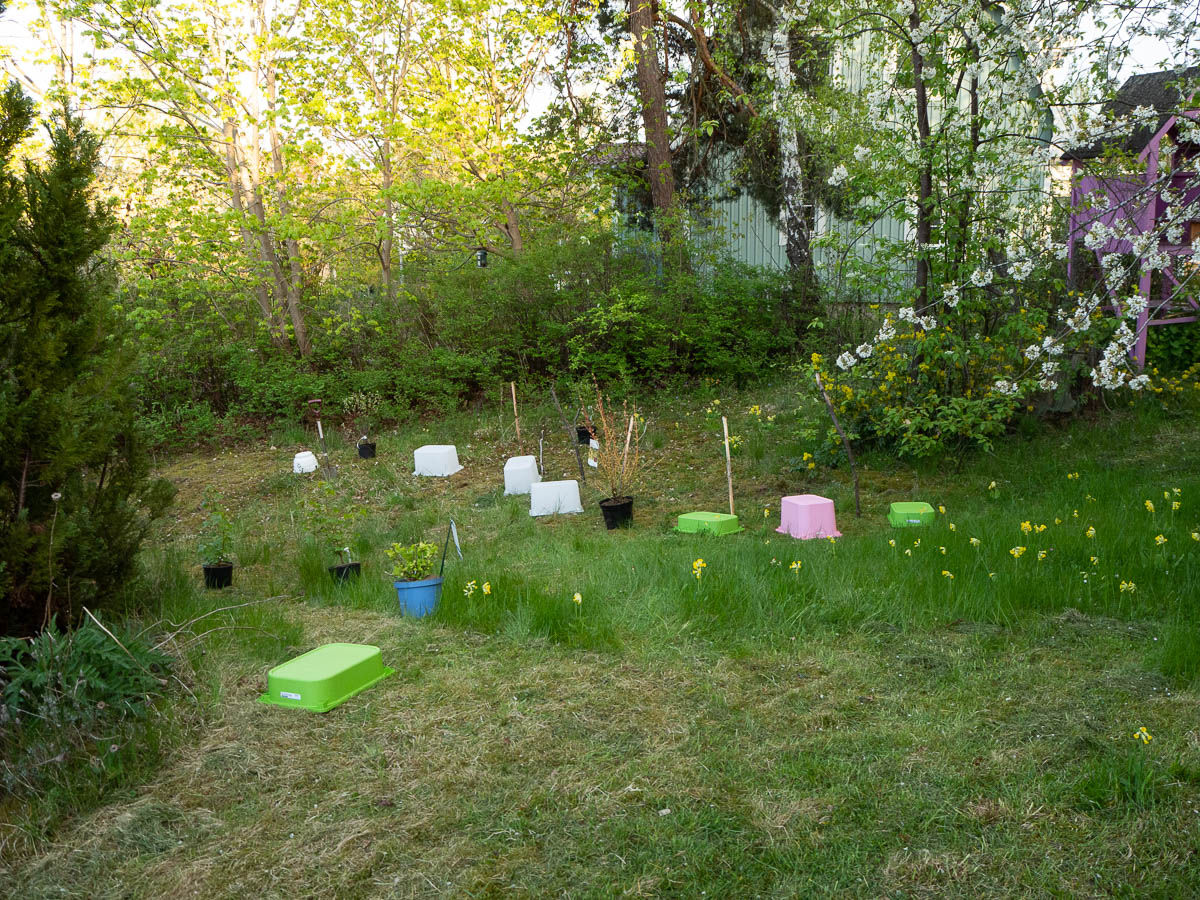
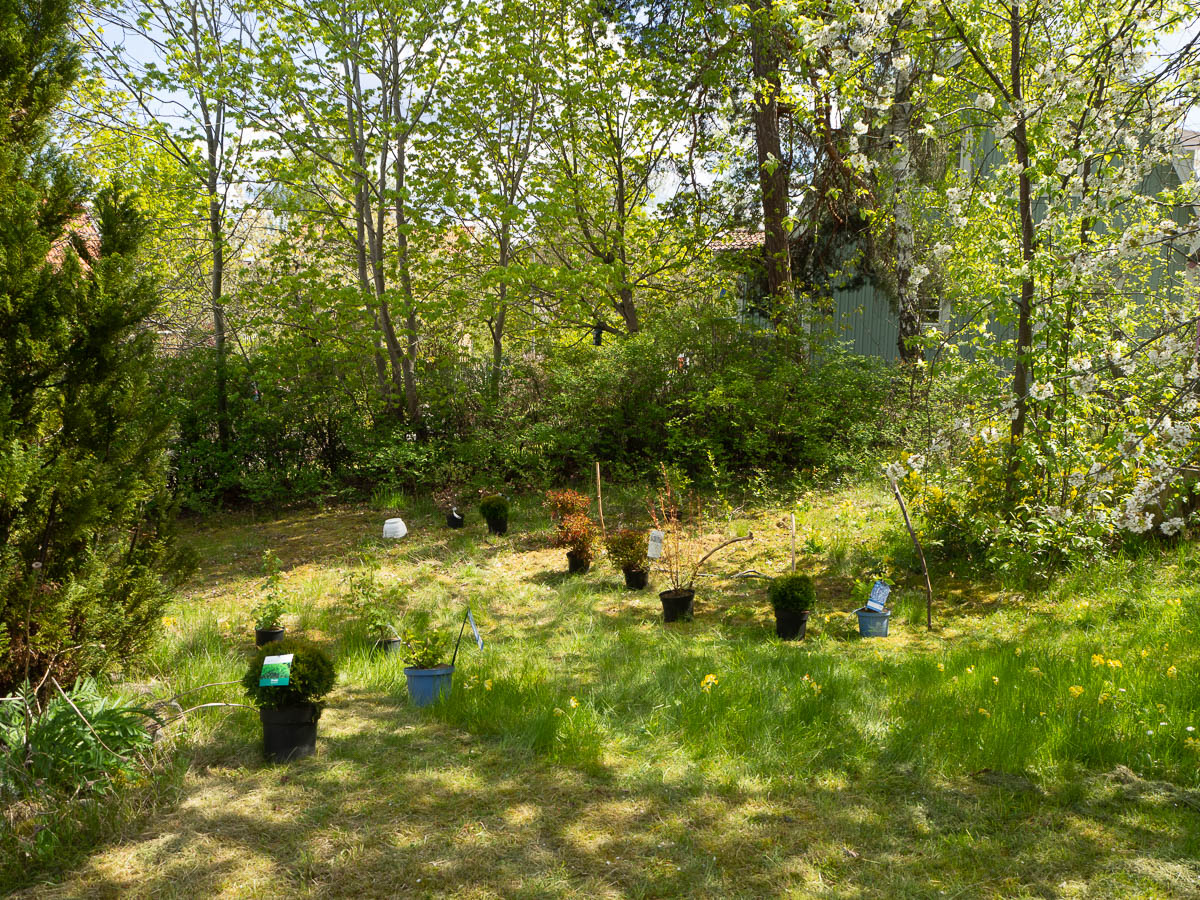
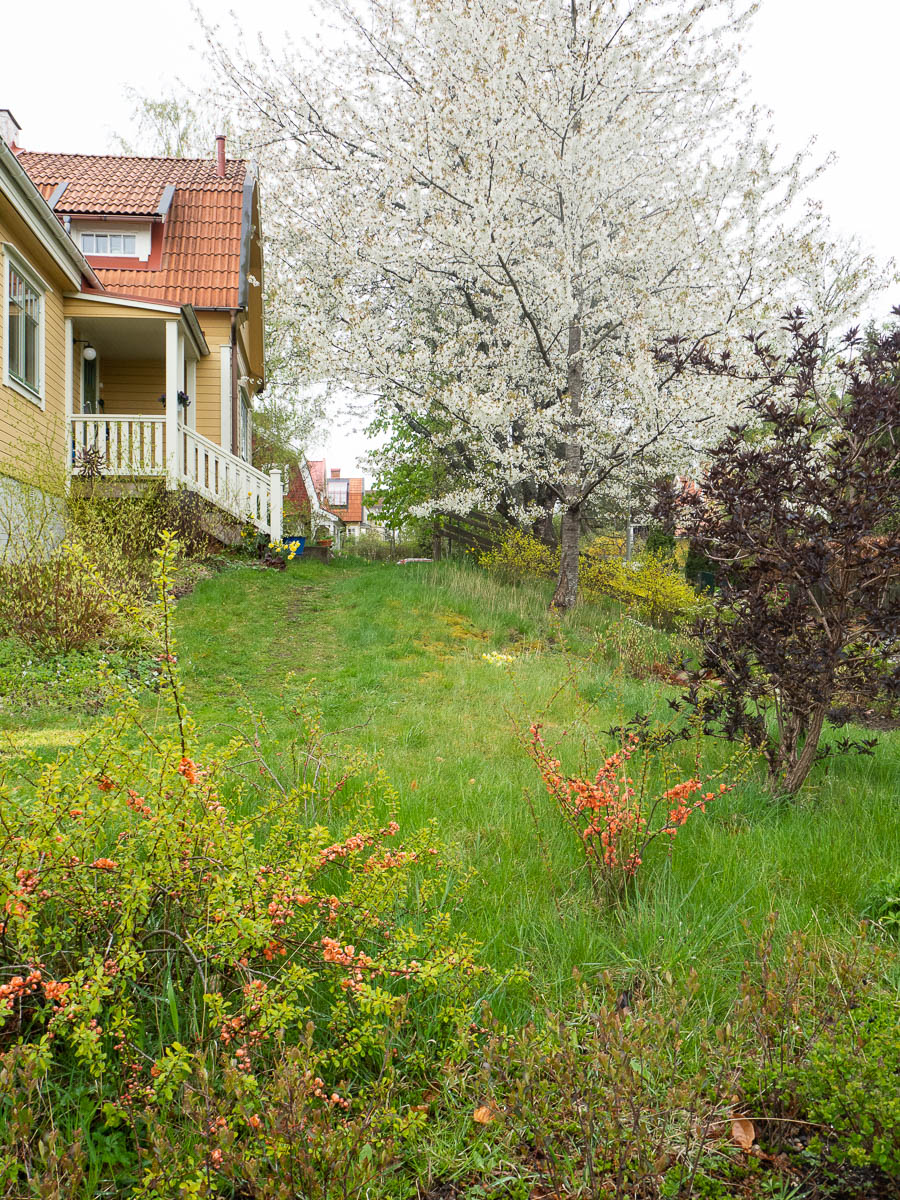
Firstly, it’s very shady since it’s surrounded by large trees on most sides. And instead of grass, the ground is covered by moss. You can see all the brown patches in the photo. The moss doesn’t bother me, but it makes me suspect that it might be more difficult to get other things to thrive there.

On top of that, a good chunk of this area has a very thin layer of soil. Adrian and I poked around today with a digging bar to see what we have to work with. The arrangement of sticks in the ground in the photo above is actually our markers of places where the soil is at least 30–40 cm deep, so there’s room to plant a normal potted bush. There’s quite a large area to the right of the sticks where I kept hitting rock after just 15 cm or so. I think there’s a single large, contiguous chunk of rock down there.

This whole area needs bushes for fullness and volume, not just pretty little things on the ground. It’s too open right now. My current vague idea is that I could cut section 4 in two parts, right along the imaginary line between the cypress on the left, and the bird cherry and mahonia on the right. Plant some bushes next to the cypress on the left, plant some more next to the bird cherry on the right, and leave a passage in between. Like this:

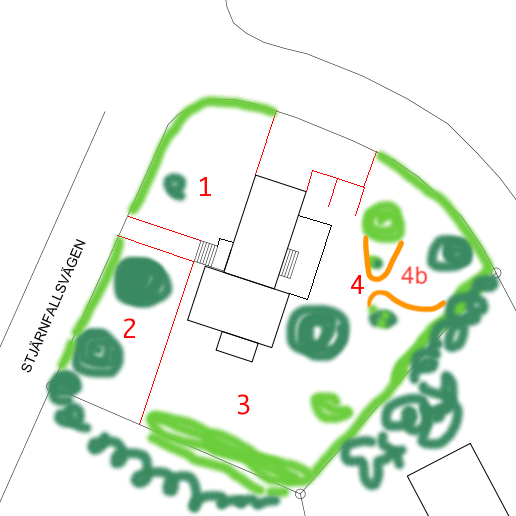
The right-hand side wall of the passage would continue in a curve, with some tallish bushes that look good from a distance, from where we sit on the deck. In front of and around the cypress and its future companions, some pretty, colourful things to look at. Peonies, maybe.

The new section 4b, beyond the passage, will then be less important since it will be less visible. There’s an apple tree there right now. Maybe I can somehow squeeze in a plum tree there somewhere? Blackcurrant bushes, maybe?


The cardigan is progressing well. I finished the body a while ago, and now the first sleeve is done.

I’m following the pattern, but more and more loosely, treating it as more of a loose design inspiration than an actual pattern.

My gauge is much tighter than the pattern requires – I didn’t like the look of the yarn with a looser knit so instead I’ve adjusted almost all stitch and row counts. (It’s a good thing the pattern description includes centimetre sizing for most measurements.) I didn’t like the look of a cutoff right across the chest, so I moved it down for a more empire-like cut. I didn’t want a looser knit for the yoke so I stayed with thinner needles and adjusted the stitch count even more. Instead of a separately knit buttonband, I knit mine along with the body of the cardigan.

The sleeve cap was hardest to adjust because it has so many adjustable parts. First I tried adjusting for my tighter gauge by following the instructions for a larger size. The sleeve cap came out way too small. Then I tried to eyeball the adjustments and made a new attempt. The sleeve cap came out too large. The third time I measured and calculated and read up on sleeve cap shaping and even pulled out Pythagoras’ theorem. And now the sleeve cap curve length matches the circumference of the armhole, give or take half a centimetre.

Sleeve cap shaping is a whole new, unexplored corner of the knitting world for me. There are even online calculators where you can plug in your numbers and get suggestions for how many stitches to decrease on each row. And technical terms – such as “sleeve cap” to begin with! I didn’t know that that’s what the curvy bit at the top of a sleeve is called. And the technical name for a garment’s armhole is “armscye”.